


Wintergatan (Martin Molin)
Martin Molin was born in Goteborg, Sweden, in the 1980's. He founded a band with 3 other people, using entirely hand built instruments....
Jack Hainsworth
Nov 11, 20181 min read


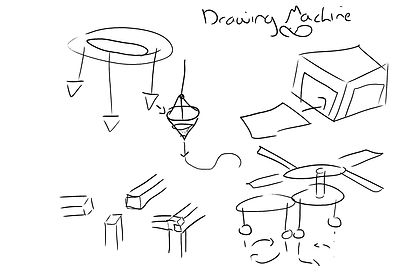
In our groups of 5, we came up with some initial ideas for the drawing machine - what it could be interpreted as and how it could be made. I had already come up with a basic idea, of a sort-of clockwork Spirograph system. I showed it to the group, and we decided that it would be much too complicated to make in the 2 week time frame we were given. We played with some other ideas involving hanging funnels of paint on a hula hoop and letting them drip onto the paper.
In the end, we decided to combine the 2 ideas, and make the clockwork Spirograph - a simplified version - and hang funnels of paint from the gears that moved.


Once we had a basic idea of what our machine would be, we started to build a prototype out of cardboard and bamboo. The structure itself was not very sturdy, which still became an issue in our final design. The gear system in our prototype was replaced with a cardboard disk with the paint droppers hanging off of it, to test if that system would work.
We tested it, and found a few problems:
-The leg and frame structure was not very strong.
-The paint was too thick to create a smooth line, instead creating drops of paint.
-The paint ran out too quickly.
-The paint dropper kept hitting the legs of the frame and causing a mess.
We decided to correct as many of these things as we could in our final design.

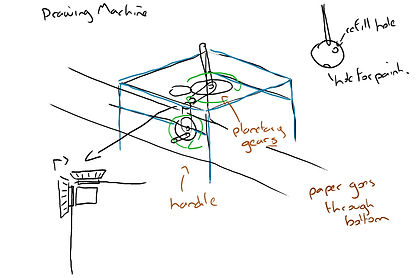
After we knew what improvements needed to be made to the machine, I started creating a 3D model, to get a sense of how big it would be, and to gather measurements from it. I used Sketchup, because this lets you take measurements, allowing for easy translation from the model to real life.
We also thought about what material the main frame should be made from. As first we considereed metal, got there wasn't enough metal piping in the store room to make the entire frame. We then thought pvc piping, but it would have been too expensive. In the end, we settled on our first idea, wood.

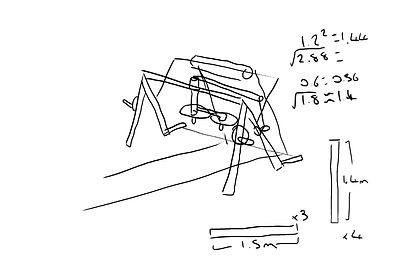
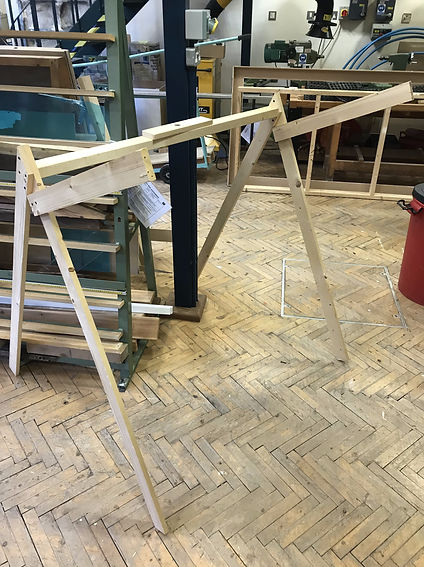
Once we had a solid idea for our machine, we went to the wood workshop to gather the materials and ask about the best way to join it. The first thing the tutor said was that there would be no way to make the leg structure sturdy in our design, which had been a problem since our prototype. He suggested a slightly different design based on a triangular frame.
We also managed to make the entire frame out of spare pieces of wood, which didn't cost anything. We attached it together with screws, and it felt much more stable. We managed to get the entire framework finished in 1 day.

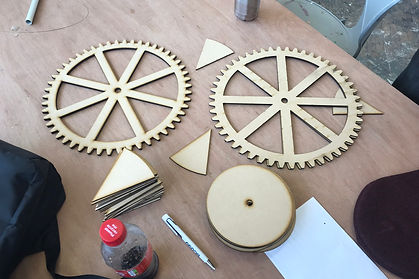
We decided that the best and most accurate way to make the gears and pulleys would be to laser cut them, to ensure that they worked. I booked a slot and designed the gears in 20 minutes and the tutor offered to cut them out over lunch.
They also gave us the spare pieces left over from cutting out the inner parts of the gears - which we are probably going to use in a later project.
These laser cut gears simply pressure fit into the metal pipes used for the axels, which allowed the mahcine to be easily disassembled once we finished the project.
The pulleys were a lot harder to get right. We had to work out how tight they needed to be, so that they grips the wooden pulleys and turned them, but not too tight as to bend the axels. In the end, we had to use a lot of duct tape to stop them from wobbling. In a better design, we could have used a different material for the pulleys, allowing the string to grip better. We coudl have also used belts instead of string, but we would have had to know exactly how long they needed to be before assembling.
We added a belt to the base of the machine, to stop the paper from getting in the way of the gears and paints while it is being rolled.
Once the entire machine was built, the rest of my team added their part, the paint dispensors themselves. We decided to go for a random selection of devices, to give a more handbuilt feel. If it had been an indevidual project ,I would have used a tubing system and identical looking droppers, so that the patterns would have been consistent. This would have removed some of the randomness of the pictures, but the tubes of paint running from the top of the machine would have added an extra level of detail to it.

Once everything was ready, we began filming the test runs. We filmed everything, so that we could create a timelapse later of setting up the machine, to create more content for the final film.
The test run ran rather well, especially the first few seconds before the paint in the funnels ran out. However, the sponges didn't start working until later on on the first reel of paper, so this created a large variation in patterns across the first piece.
In the second run, we didn't water the paint down as much, so it dripped out of the funnels slower, lasting logner. However, this meant that it wasn't a constistent line, but rather just blobs. At least this created 2 different paintings in the end.
I edited the videso together in Adobe Premiere, with some input from a few members of the group as to waht should go where. We then had to find some music for the background, so add more interest. This was one of the harder parts of making the video, as a lot of the music we could find on royalty free websites was very generic and pop-y.


